Butterfly Planter and Tray, 3 Sizes: A Practical Guide for Creators
Transforming a sterile apartment corner into a vibrant mini garden often starts with the right vessel. The Butterfly Planter and Tray, 3 Sizes digital design offers exactly that opportunity, combining whimsical aesthetics with functional engineering. This STL file set allows you to 3D print a charming pot featuring a ribbed drip tray, perfect for holding small succulents, herbs, or trailing vines in tight living spaces. However, downloading a digital file is only the first step; successfully bringing this design to life requires attention to detail that many beginners overlook.
While the concept of printing your own boho home decor is appealing, rushing through the process can lead to wasted filament, structural failures, or unsightly finishes. Understanding the nuances of this specific model ensures your final product looks professional rather than like a failed experiment. Whether you are a hobbyist looking to personalize your space or an entrepreneur planning to sell these planters, avoiding common pitfalls is essential for quality results.
Understanding the Design and Its Purpose
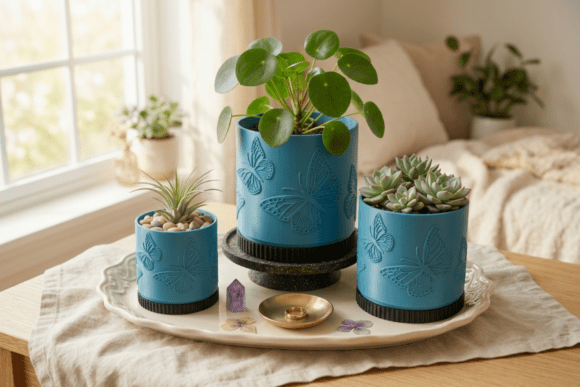
The Butterfly Planter and Tray, 3 Sizes is not just a decorative object; it is a system designed to manage water and display plants effectively. The inclusion of three distinct sizes—Small (104mm diameter), Medium (154mm diameter), and Large (180mm diameter)—provides versatility for different plant types and growth stages. The ribbed drip tray is a critical component, designed to catch excess water and prevent damage to furniture while adding a textured visual element.
Many users assume that because the files are free or low-cost, the result will be instant perfection. In reality, the success of this project hinges on how well you interpret the provided specifications. The design relies on precise dimensions to ensure the planter sits securely within the tray and that drainage holes function correctly without compromising structural integrity. Ignoring these details can turn a delightful addition to your indoor garden into a leaky, unstable mess.
Common Mistakes When Slicing and Printing
One of the most frequent errors involves ignoring the suggested printer settings. The design specifies a layer height of 0.2mm, four top and bottom layers, and three or four perimeters. Beginners often default to their slicer's "fast" or "draft" settings to save time, which frequently results in weak walls that cannot hold soil or water pressure. For a planter, wall thickness is non-negotiable; too thin, and the pot may crack under the weight of wet soil.
Another overlooked detail is the infill pattern. The recommendation is for a 15–20% Gyroid or Grid pattern. Using a lower infill percentage might seem like a way to conserve material, but it reduces the rigidity of the butterfly wings and the overall pot structure. Conversely, using a solid infill wastes significant time and filament without adding necessary strength. The Gyroid pattern is specifically chosen for its isotropic strength, meaning it supports the pot equally well from all angles, preventing deformation as the plant grows.
Perhaps the most critical mistake is neglecting the seam placement. The instructions advise setting the seam to "Nearest." If you leave the seam on a random side, the start and end point of each layer will create a visible line on the surface of the butterfly wings. This disrupts the smooth aesthetic and can make the planter look unfinished. By aligning the seam nearest to the back or inside of the tray, you ensure the visible exterior remains clean and polished.
The Importance of Drainage and Support
The design includes six files: three planters with pre-modeled drainage holes and three matching drip trays. A common misunderstanding is assuming you need to add supports during the print. The geometry of the butterfly wings is engineered to be self-supporting at the specified scale. Adding supports where they aren't needed creates unnecessary texture marks on the delicate wing surfaces, requiring extensive post-processing sanding to remove.
However, do not skip the drainage holes entirely if you decide to modify the file. These holes are vital for plant health. Without them, water accumulates at the bottom, leading to root rot—a common killer of houseplants. While the drip tray catches runoff, the planter itself must allow water to escape freely. If you are printing multiple units, verify that the nozzle size matches the hole diameter; a large nozzle might clog or distort small drainage features.
Temperature settings are another variable that often causes issues. Since the prompt notes that temperatures depend on your specific filament and printer, relying on generic defaults can be risky. PLA is generally safe, but if you are using PETG for durability, you must adjust bed adhesion and cooling fans. Poor temperature control can lead to warping, especially on the flat bottom of the drip tray, causing it to sit unevenly on tables or shelves.
Choosing the Right Size for Your Space
Selecting the correct size from the Butterfly Planter and Tray, 3 Sizes collection is crucial for both aesthetics and plant health. The Small size, with a 104mm inner diameter and 124mm height, is ideal for single succulents or small seedlings. The Medium (154mm x 180mm) suits standard potted herbs or small ferns, while the Large (180mm x 209mm) accommodates larger foliage plants.
A practical mistake is overfilling the smallest pot with a large plant. This restricts root growth and makes the planter top-heavy, increasing the risk of tipping. Conversely, placing a tiny plant in the largest pot can lead to soil staying wet for too long due to the high volume of dirt relative to the plant's water intake. Measure your current nursery pots before printing to ensure a snug fit. Remember that the inner diameter is the usable space, so account for the thickness of the pot walls when calculating capacity.
Quality Control Before You Print
Before committing hours of print time, take a moment to inspect the STL files in your slicing software. Rotate the model to check for any unexpected artifacts or scaling errors. Ensure the scale is set to 100%; some slicers default to metric or imperial mismatches that can shrink your planter by half. Verify that the ribbed texture on the tray is oriented correctly to channel water toward the center or edges as intended.
If you are planning to sell these items or gift them, consider the finish. Even with good settings, 3D printed objects have layer lines. A light sanding followed by a primer coat can elevate the presentation significantly, making the butterfly design pop. Do not skip the calibration prints; printing a test version of the drip tray first can reveal bed leveling issues before you waste filament on a full-sized planter.
By respecting the technical requirements and understanding the purpose behind the design choices, you can avoid the frustration of failed prints. The Butterfly Planter and Tray, 3 Sizes is a robust design, but it demands respect for the manufacturing process. With careful attention to layer height, infill density, and seam placement, you will create a durable, beautiful piece of decor that enhances any mini apartment garden or boho interior.